Hi everybody! I am here with another tutorial about how to host your website
yourdomain.com.np on any PHP web host along with Google Blogger like
blog.yourdomain.com.np. You have previously learned about hosting your website on blogger but it is only limited to blog so this tutorial is certainly going to help you to host your custom site or any cms to host on any webhost along with the blog in blogger. I think you understood what I meant to say. Okay lets start with the easy way.

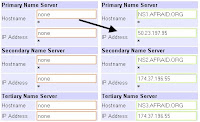
Step1: Log-in to you domain control panel and change the name server as listed below
Primary Name Server: NS1.AFRAID.ORG
IP Address: 50.23.197.95
Secondary Name Server: NS2.AFRAID.ORG
IP Address: 174.37.196.55
Tertiary Name Server: NS3.AFRAID.ORG
IP Address: 72.20.15.62
Note: This dns server belongs to Afraid.Org which is free DNS service provider and reliable too.

Step 2: Now visit
freedns.afraid.org and click on
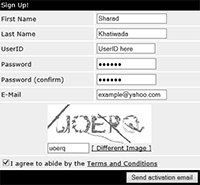
Sign Up! and fill the form. Activate your account with the link mailed on your email account. So describing Afraid.Org( I will abbreviate it as AO) it is the free DNS hosting let you fully manage your own domain. It is very very simple to use and work quite well. Once you are done then you are ready to start.

Step 3: On you AO account click on "
Domains" on the left sidebar. You will find "
Add Domain" on the page somewhere. This is the place where you are going to add your domain to work. So click on "
Add Domain" and you will be redirected to their domain manager.

Step 4: On AO domain manager type your registered .np domain. If you want to share your domain in public then keep it public else select the Private options from the drop down menu. I prefer to keep it private. Now submit the form. You will be redirected to Addition Success! page with the message 'Domain yourdomain.com.np has been added to the system.'. You have to wait for few days until your domain propagates to AO DNS Nameserver. It may take 3 working days or more than a week sometime.


Step 5: Click on "
Domains" and on the "Manage" beside your Domain name. You will notice the 6 subdomains with your domain out of which 5 are "
Not Yet Configured." and 1 with the MX record. This is the place where we are now going to configure the A and CNAME Records. On this page you already got the naked domain "
yourdomain.com.np" un-configured. So click on the unconfigured domain name. Now you are editing
yourdomain.com.np which is A type. On destination type A record which in in the form of IP provided by webhost. Leave other field as it is and click on
Save button.
Note: You can find the A record from your webhost detail page or you can contact your web hosting company.
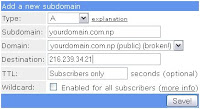
Step 6: Now on the "
Subdomains" page click on the
[ add ] link to add remaining CNAME records.
Subdomain: www
Domain: yourdomain.com.np
Destination: yourdomain.com.np
and
Subdomain: blog
Domain: yourdomain.com.np
Destination: ghs.google.com
Hope you have made it successfully. If yes then working with AO is over. Now we are moving to your web host and Blogger to make this final setup.
Step 7: Open the
Google Blogger site. Sign in with your Google account or you can
Sign up new here. On the blogger dashboard you will find the
New Blog button on the left side bar. Click it and a popup appears on your screen. See on the screenshot below.
Fill the form with Title and Address. When you see the blue square box with Right tick on it, that means the blog address is available else try with some other address. Select the Template available on the pane(You can change it later). Finally click on the Create Blog button to make it your own.
Step 8: When you are into the Blogger Home click on the More options button next to your blog title and go to the Settings option.
On the Setting page you will find the Publishing options where your Blog Address appears. Below that you will find "+ Add a custom domain" . Click it!
Step 9: Now you are about to complete the process. After clicking "+ Add a custom domain" message says if you want to buy a domain for your blog. Below that you can see "Already own a domain? Switch to advanced settings". Click on "Switch to advanced settings" . On the "Advanced setting" enter your domain name for blog like "blog.yourname.com.np". Don't forget to prefix blog before your domain name and Save the form.
Step 10: Log on to your web hosting control panel and find "Add Domain" to add your domain name yourdomain.com.np. Now try to visit your site on your favorite browser. If its working fine than congratulation or else you can wait and hour or two to get your domain propagated by afraid.org. If you got any difficulties doing so then you can comment below on the comment form.


